
温柔的接触器Moly
【瑞萨AI挑战赛】RA8P1 边缘视觉的驾驶员疲劳预警实现
一、前言
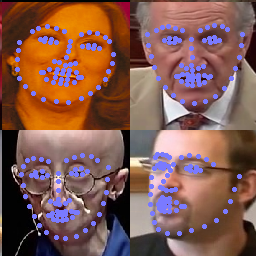
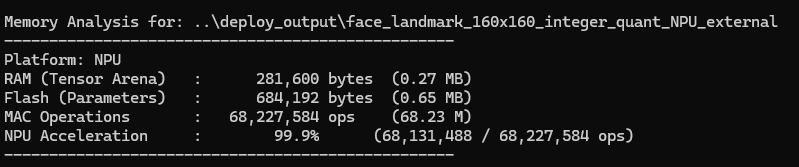
在前一篇文章中,我们已经实现了一个简易的智能AI网络监控摄像头方案,该方案采用“纯边缘计算+流媒体”架构,通过 MIPI 接口获取高清视频流,利用 NPU 在本地飞速执行“人脸检测 (YOLO)”实现智能监控,这篇文章我们将在上一篇文章的基础上,引入人脸关键点定位模型,通过NPU 执行“人脸检测 (YOLO) + 68点人脸关键点定位”的双模型级联推理,CPU 核心通过分析关键点坐标实时计算人眼的闭合比例(EAR, Eye Aspect Ratio)以精准判定人员的疲劳/打盹状态,总检测时间仅约36ms。
二、推理流水线设计
2.1 第一级:YOLO-Fastest 人脸检测与硬件图像预处理
图像数据的源头由 OV5640 摄像头通过高带宽的 MIPI CSI-2 接口输入。为了减轻 CPU 的负担,本方案启用了 RA8P1 内置的视频输入模块(VIN)进行硬件加速,自动将 MIPI 传来的 YUV422 视频流转换为 RGB565 格式,并通过内部 DMA 直接“零拷贝”写入位于外部 HyperRAM 中的帧缓冲区。 随后,NPU 接管数据,执行 INT8 量化的 YOLO-Fastest 人脸检测模型。该模型输入尺寸为 192x192,NPU 单帧推理耗时仅约 8 毫秒,能够以极高的帧率在全图中锁定人脸的感兴趣区域(ROI)。
2.2 第二级:68 点人脸关键点定位与特征提取
在 YOLO 模型输出人脸边界框后,Cortex-M85 CPU 发挥其强大的标量处理能力,迅速将该 ROI 区域从 HyperRAM 的原始图像中裁剪并缩放,作为第二级模型的输入。随后,再次唤醒 NPU 执行 68 点人脸关键点(Landmark)检测模型,精准回归出人脸五官的像素坐标。
2.3 外部 Flash XIP 高速映射
两套 INT8 模型的权重体积庞大,强行放入 MCU 内部的 1MB MRAM 中显然捉襟见肘。 为此,本方案启用了板载的高速八线外部 Flash(W35T51NW,容量高达 64MB)。通过手动编写底层FLM 烧录算法,利用 RA8P1 的 OSPI0 控制器(CS1 片选),将这块外部 Flash 直接以 XIP(Execute-In-Place)模式映射至 CPU 的 0x90000000 物理地址空间。在实际推理时,NPU 能够像访问内部 SRAM 一样,通过 AXI/AHB 总线高速读取外部模型权重,完美实现了算力与存储容量的平衡。
三、实现细节
3.1 添加Flash XIP支持
- 在Keil Package 安装Renesas DFP 6.4.0支持包,随后在DFP包安装目录找到RA8P1 FLM模板
PS: > ${RA_DFP_DIR}\Arm\Packs\Renesas\RA_DFP\6.4.0\Flash\RA8P1
2. 由于模板代码中已有OSPI的支持RA8P1_SI_8M,我们只需参照W35T51NW修改FlashPrg.c,以及FlashDev.c
- 修改设备起始地址,设备类型,以及扇区大小

- 依照W35T51NW手册修改Flash Command (Program,Read,Erase,Status)定义

- 参考Titanboard SDK/Flash 文件系统使用说明修改Flash Pin脚定义
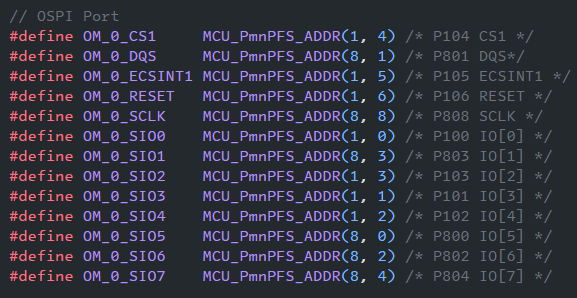
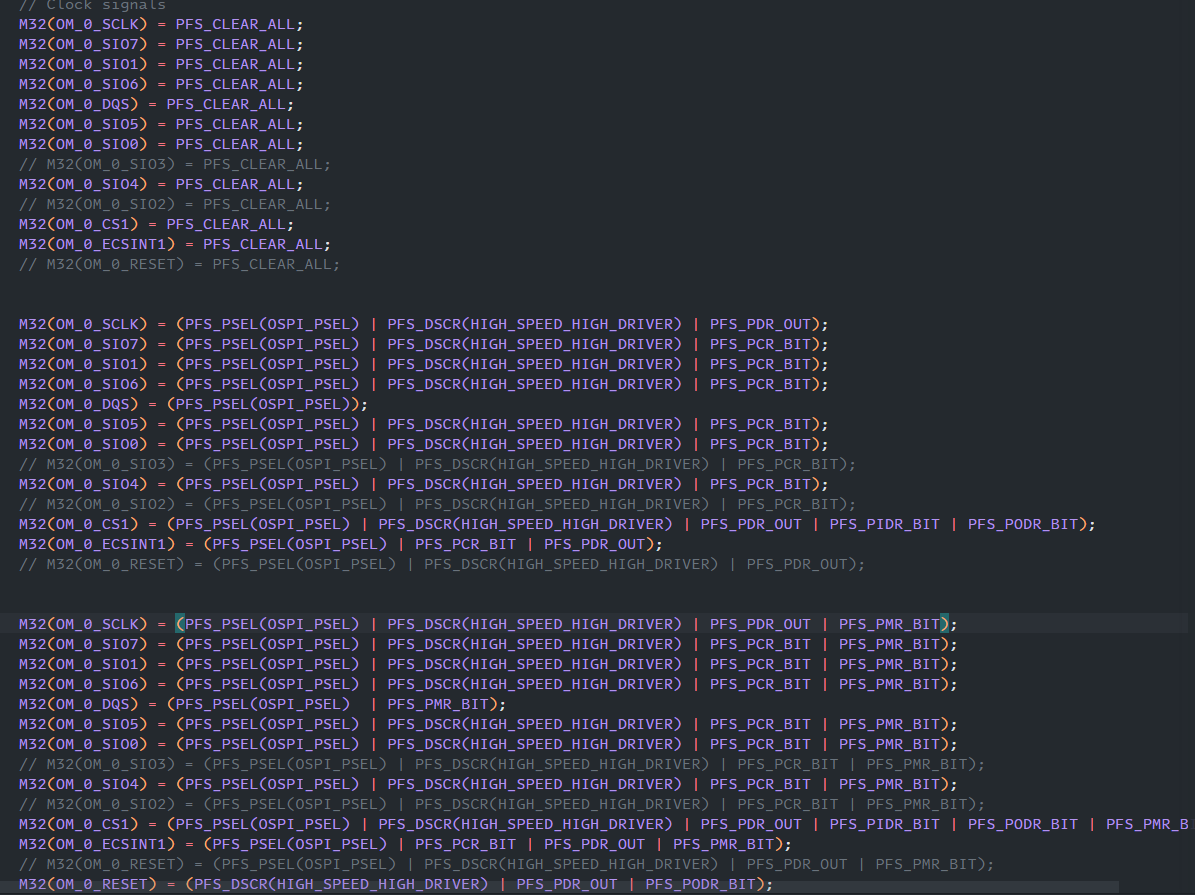
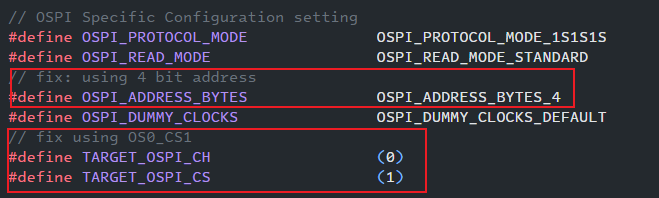
注意:由于原模板代码使用的是OSPI Channel 1 CS 1,我们还需要额外将OSPI通道和片选更换为Titan Board上的Channel 0 CS1!此外为了完整的使用Flash 64M空间,还需要将地址模式更改为4bytes
修改完成之后直接编译,便可获得FLM算法文件,将此文件复制到Keil Flash或者RA DFP Flash目录,同时在Flash Download添加,即可启用Flash下载
PS: > ${RA_DFP_DIR}\Arm\Packs\Renesas\RA_DFP\6.4.0\Flash
# 或者
PS:> ${KEIL_INSTALL_DIR}\ARM\Flash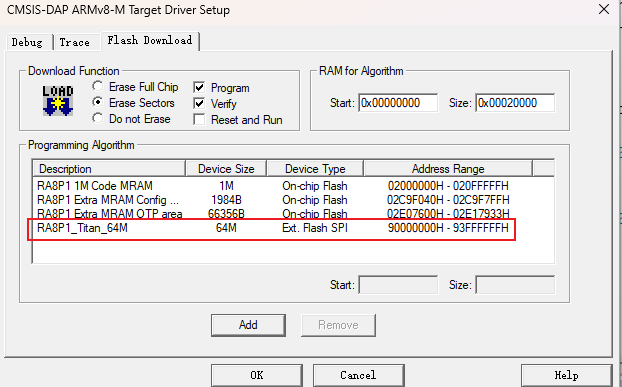
参考Titanboard SDK/Flash 文件系统使用说明,在我们的FSP工程中添加OSPI支持
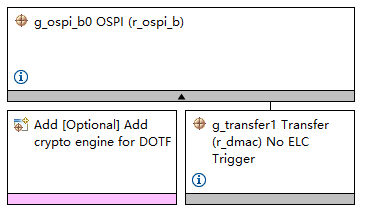
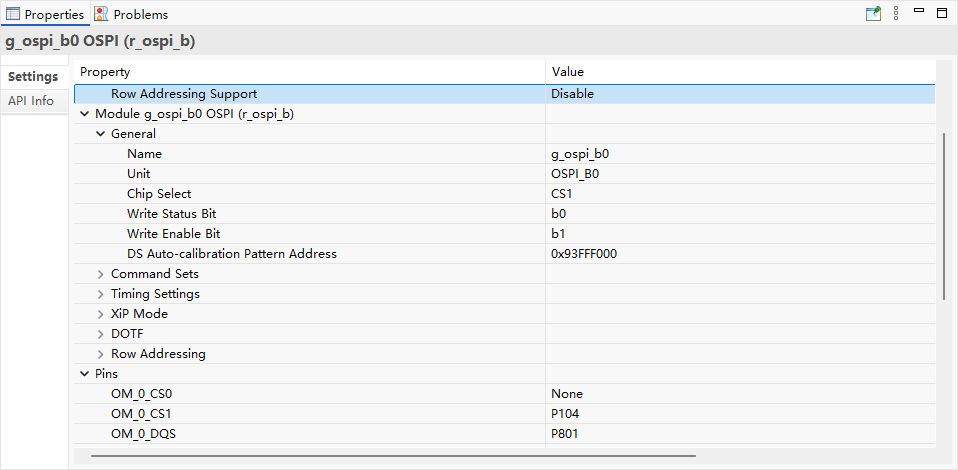
初始化并启用OSPI模块
fsp_err_t ospi_b_init(void)
{
	/* By default, the flash device is in SPI mode, so it is necessary to open the OSPI module in SPI mode */
	fsp_err_t err = FSP_SUCCESS;
	spi_flash_direct_transfer_t transfer =
    {
        .command        = RESET_VALUE,
        .address        = RESET_VALUE,
        .data           = RESET_VALUE,
        .command_length = RESET_VALUE,
        .address_length = RESET_VALUE,
        .data_length    = RESET_VALUE,
        .dummy_cycles   = RESET_VALUE
    };

	/* Open OSPI module */
	err = R_OSPI_B_Open(&g_ospi_b0_ctrl, &g_ospi_b0_cfg);
	ERROR(err, "R_OSPI_B_Open API FAILED");

	/* Switch OSPI module to 1S-1S-1S mode to condiv flash device */
	err = R_OSPI_B_SpiProtocolSet(&g_ospi_b0_ctrl,
			SPI_FLASH_PROTOCOL_EXTENDED_SPI);
	ERROR(err, "R_OSPI_B_SpiProtocolSet API FAILED");

	/* Reset flash device by driving OM_RESET pin */
	R_XSPI0->LIOCTL_b.RSTCS0 = 0;
	R_BSP_SoftwareDelay(OSPI_B_TIME_RESET_PULSE, OSPI_B_TIME_UNIT);
	R_XSPI0->LIOCTL_b.RSTCS0 = 1;
	R_BSP_SoftwareDelay(OSPI_B_TIME_RESET_SETUP, OSPI_B_TIME_UNIT);

	fsp_err_t err = FSP_SUCCESS;
	spi_flash_direct_transfer_t transfer =
    {
        .command        = RESET_VALUE,
        .address        = RESET_VALUE,
        .data           = RESET_VALUE,
        .command_length = RESET_VALUE,
        .address_length = RESET_VALUE,
        .data_length    = RESET_VALUE,
        .dummy_cycles   = RESET_VALUE
    };
	bsp_octaclk_settings_t      octaclk  =
    {
        .source_clock  = RESET_VALUE,
        .divider       = RESET_VALUE
    };
	if (SPI_FLASH_PROTOCOL_EXTENDED_SPI == g_ospi_b0_ctrl.spi_protocol)
	{
		/* Do nothing */
	}
	else if (SPI_FLASH_PROTOCOL_8D_8D_8D == g_ospi_b0_ctrl.spi_protocol)
	{
		/* Transfer write enable command */
		err = ospi_b_write_enable();
		ERROR(err, "ospi_b_write_enable FAILED");

#if 0  //mask for Winbond QSPI Flash W35T51NW
        /* Write to CFR5V Register to Condiv flash device interface mode */
        transfer = g_ospi_b_direct_transfer[OSPI_B_TRANSFER_WRITE_CFR5V_OPI];
        transfer.data = OSPI_B_DATA_SET_SPI_CFR5V_REGISTER;
        err = R_OSPI_B_DirectTransfer(&g_ospi_b_ctrl, &transfer, SPI_FLASH_DIRECT_TRANSFER_DIR_WRITE);
        ERROR(err, "R_OSPI_B_DirectTransfer API FAILED");
#endif

		/* Change the OCTACLK clock to 100 MHz in SDR mode without OM_DQS */
		octaclk.source_clock = BSP_CLOCKS_SOURCE_CLOCK_PLL2P;
		octaclk.divider = BSP_CLOCKS_OCTA_CLOCK_DIV_2;
		R_BSP_OctaclkUpdate(&octaclk);

		/* Switch OSPI module mode to SPI mode */
		err = R_OSPI_B_SpiProtocolSet(&g_ospi_b0_ctrl, SPI_FLASH_PROTOCOL_EXTENDED_SPI);
		ERROR(err, "R_OSPI_SpiProtocolSet API FAILED");

#if 0  //mask for Winbond QSPI Flash W35T51NW
        /* Read back and verify CFR5V register data */
        transfer = g_ospi_b_direct_transfer[OSPI_B_TRANSFER_READ_CFR5V_SPI];
        err = R_OSPI_B_DirectTransfer(&g_ospi_b_ctrl, &transfer, SPI_FLASH_DIRECT_TRANSFER_DIR_READ);
        ERROR(err, "R_OSPI_B_DirectTransfer API FAILED");
        if(OSPI_B_DATA_SET_SPI_CFR5V_REGISTER != (uint8_t)transfer.data)
        {
            ERROR(err, "Verify CFR5V register data FAILED");
            return FSP_ERR_ABORTED;
        }
#endif

	}
	else
	{
		ERROR(err, "Flash device do not support this mode\r\n");
		return FSP_ERR_INVALID_MODE;
	}

	return FSP_SUCCESS;
	}
#include "async_logger.h"
#include "raw_thread.h"
#include "hal_data.h"

#define HYPERRAM_BASE_ADDR 0x70000000
#define TEST_OFFSET 0x100000

#define FLASH_TEST_ADDRESS 0x00000000 // 测试第 0 个扇区
#define FLASH_MAPPED_ADDR  0x90000000 // FSP 中的映射首地址

void ospi_flash_init(void);
void ospi_wait_for_ready(void);
void ospi_flash_test(void);
int _flash_init(void);

/* HyperRAM Test Thread entry function */
void raw_thread_entry(void)
{
    /* 初始化 OSPI (HyperRAM) */
    fsp_err_t err = R_OSPI_B_Open(&g_ospi1_ctrl, &g_ospi1_cfg);
    if (err == FSP_SUCCESS)
    {
        APP_PRINT("\r\n[ram_thread] HyperRAM Initialized Successfully!\r\n");
    }
    else
    {
        APP_PRINT("** ERROR: HyperRAM Init failed **\r\n");
        APP_ERR_TRAP(err);
    }

		// 初始化OSPI (HyperFlash)
		if (0 == _flash_init())
		{
			APP_PRINT("\r\n[ram_thread] HyperFlash Initialized Successfully!\r\n");
		}else
    {
        APP_PRINT("** ERROR: HyperFlash Init failed **\r\n");
        APP_ERR_TRAP(err);
    }

    /* 简单的读写测试 */
    uint32_t *test_ptr = (uint32_t *)(HYPERRAM_BASE_ADDR + TEST_OFFSET);
    uint32_t magic_word = 0xDEADBEEF;

    /* 写入测试 */
    *test_ptr = magic_word;


    SCB_CleanInvalidateDCache_by_Addr(test_ptr, 4);

    /* 读取校验 */
    uint32_t read_back = *test_ptr;
    if (read_back == magic_word)
    {
        APP_PRINT("\r\n[ram_thread] HyperRAM Read/Write Test PASS! Data: 0x%08X\r\n", read_back);
    }
    else
    {
        APP_PRINT("** Error HyperRAM Test FAILED! Expected 0x%08X, got 0x%08X\r\n", magic_word, read_back);
    }

    while (1)
    {
        tx_thread_sleep(100);
    }
}
3.2 训练部署人脸关键点检测模型
参照610265158/Peppa_Pig_Face_Landmark
下载Peppa_Pig_Face_Landmark项目
$ git clone https://github.com/610265158/Peppa_Pig_Face_Landmark
$ cd TRAIN/face_landmark下载WFLM人脸关键点标注数据集,在train_config.py中指定数据集位置
config.DATA.root_path='../WFLW_images'
config.DATA.train_f_path='../WFLW_annotations/list_98pt_rect_attr_train_test/list_98pt_rect_attr_train.txt'
config.DATA.val_f_path='../WFLW_annotations/list_98pt_rect_attr_train_test/list_98pt_rect_attr_test.txt'
config.DATA.extra_data=False
训练
$ run.sh
训练结果
将模型转换为ONNX
$ python tools/convert_to_onnx.py --model ./keypoints.pth使用Renesas_RUHMI将ONNX模型转换为部署的C Code,注意添加Flash参数
$ python mcu_compile.py ../face ../deploy_output --npu --weight-loc=Flash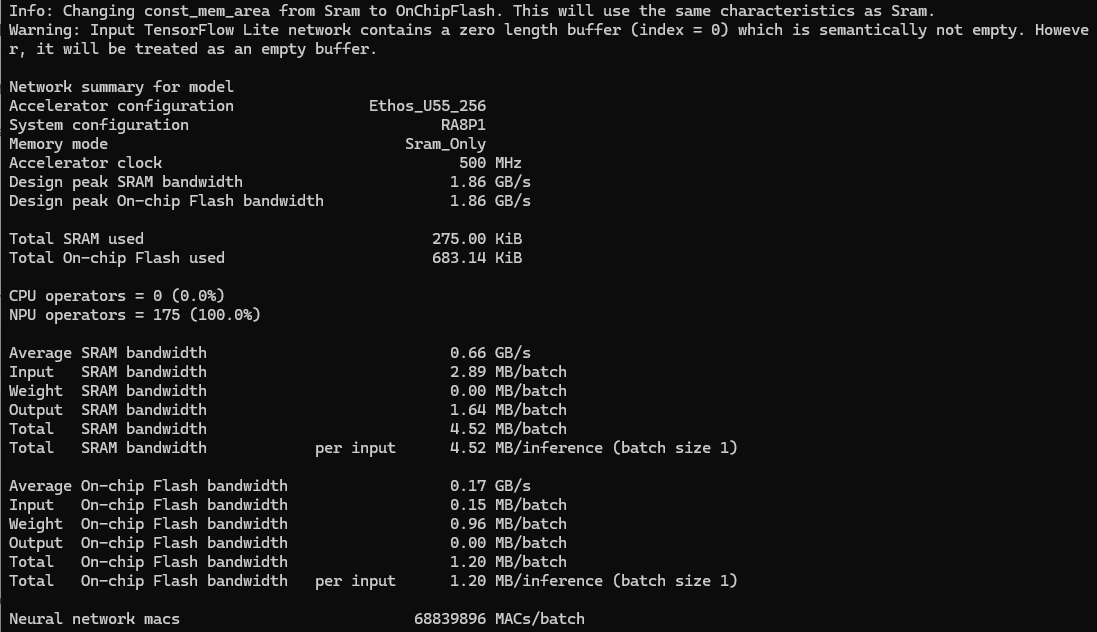
修改模型command_stream, model_data数组的section__attribute__((aligned(16), section(".ospi0_cs1"))),指定下载到Flash
__attribute__((aligned(16), section(".ospi0_cs1"))) const uint8_t face_sub_0000_command_stream[15332]
__attribute__((aligned(16), section(".ospi0_cs1"))) const uint8_t face_sub_0000_model_data[684192]
疲劳状态判断
本方案通过分析人脸关键点坐标实时计算人眼的闭合比例(EAR, Eye Aspect Ratio)以精准判定人员的疲劳/打盹状态
在标准的 68 点人脸模型中:
左眼的 6 个关键点序号是:
36, 37, 38, 39, 40, 41右眼的 6 个关键点序号是:
42, 43, 44, 45, 46, 47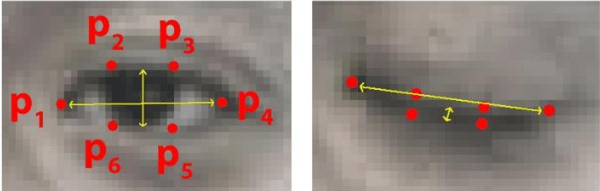
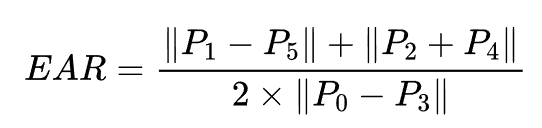
- 分子是眼睛垂直方向的两组点距之和(反映眼睛张开的高度)。
- 分母是眼睛水平方向的点距(反映眼睛的宽度,乘 2 是为了权重复合)。
- 当人睁眼时,EAR 大约在 0.25∼0.35 之间波动;当人闭眼时,EAR 会骤降到 0.1 以下
#include "async_logger.h"
#include "ear.h"
#include "face_landmarks.h"
#include "face_model.h"
#include "model.h"
#include "npu_infer_thread.h"
#include "pmu_ethosu.h"
#include "yolo_rtthread.h"
#include <math.h>
#define CAM_WIDTH 320
#define CAM_HEIGHT 240
#define COLOR_RED 0xF800
#define COLOR_GREEN 0x07E0
#define RGB565_GREEN 0x07E0
#define RGB565_RED 0xF800
#define RGB565_BLUE 0x001F
#define RGB565_YELLOW 0xFFE0
#define LANDMARK_COLOR RGB565_GREEN
extern uint8_t camera_capture_image_rgb565[];
extern TX_SEMAPHORE g_ai_start_sem;
extern TX_SEMAPHORE g_ai_done_sem;
int8_t in_i8[INPUT_W * INPUT_H] BSP_PLACE_IN_SECTION(".ospi1_cs0_noinit") BSP_ALIGN_VARIABLE(8);
float out_f1[output1_len] BSP_PLACE_IN_SECTION(".ospi1_cs0_noinit") BSP_ALIGN_VARIABLE(32);
float out_f2[output2_len] BSP_PLACE_IN_SECTION(".ospi1_cs0_noinit") BSP_ALIGN_VARIABLE(32);
int8_t in_i8_face[160 * 160 * 3] BSP_PLACE_IN_SECTION(".ospi1_cs0_noinit") BSP_ALIGN_VARIABLE(8);
float out_f1_landmarks[136] BSP_PLACE_IN_SECTION(".ospi1_cs0_noinit") BSP_ALIGN_VARIABLE(32);
void draw_bbox_rgb565(uint8_t *img_buffer, int img_w, int img_h, int x, int y, int w, int h, uint16_t color,
                     int line_width);
void draw_points_rgb565(uint8_t *img_buffer, int img_w, int img_h, int x, int y, int radius);
FatigueTracker ear_tracker;
/* Infer Thread entry function */
void npu_infer_thread_entry(void)
{
   int16_t status = FSP_SUCCESS;
   status = RM_ETHOSU_Open(&g_rm_ethosu0_ctrl, &g_rm_ethosu0_cfg);
   if (status != FSP_SUCCESS)
   {
       APP_PRINT("** [Infer Thread] Failed to start NPU");
       return;
   }
   init_fatigue_tracker(&ear_tracker);
   while (1)
   {
       if (tx_semaphore_get(&g_ai_start_sem, TX_WAIT_FOREVER) == TX_SUCCESS)
       {
           ULONG infer_start_time = tx_time_get();
           rgb565_to_gray_resize_192_and_quantization(camera_capture_image_rgb565, CAM_WIDTH, CAM_HEIGHT, in_i8);
           memcpy(GetModelInputPtr_serving_default_image_input_0(), in_i8, INPUT_SIZE);
           RunModel(false);
           int8_t *output1 = GetModelOutputPtr_StatefulPartitionedCall_0_70273(); // 6
           int8_t *output2 = GetModelOutputPtr_StatefulPartitionedCall_1_70283(); // 12
           dequantize_int8(output1, out_f1, output1_len, scale_out1, zero_point_out1);
           dequantize_int8(output2, out_f2, output2_len, scale_out2, zero_point_out2);
           int16_t total = 0;
           static det_box_t pool[540]; // 6*6*3 + 12*12*3 = 108 + 432 = 540
           total += decode_output_layer(out_f1, GRID_SIZE_1, 0, CAM_WIDTH, CAM_HEIGHT, CONF_THRESH, pool + total,
                                        (int16_t)(sizeof(pool) / sizeof(pool[0])) - total);
           total += decode_output_layer(out_f2, GRID_SIZE_2, 1, CAM_WIDTH, CAM_HEIGHT, CONF_THRESH, pool + total,
                                        (int16_t)(sizeof(pool) / sizeof(pool[0])) - total);
           // nms
           int32_t kept = nms_filter(pool, total, NMS_THRESH);
           int32_t out_n = MIN(kept, MAX_BOXES); // 拷贝前 kept(不超过 MAX_BOXES)
           if (out_n > 0)
           {
               int x = pool->x1;
               int y = pool->y1;
               int w = abs(pool->x2 - pool->x1);
               int h = abs(pool->y2 - pool->y1);
               draw_bbox_rgb565(camera_capture_image_rgb565, 320, 240, x, y, w, h, COLOR_RED, 3);
               float face_ratio = 0;
               int pad_left = 0, pad_top = 0;
               CropResizeWithPad_RGB565(camera_capture_image_rgb565, w, h, (uint8_t *)in_i8_face, &face_ratio,
                                        &pad_left, &pad_top);
               memcpy(face_GetModelInputPtr_serving_default_input_0(), in_i8_face, 160 * 160 * 3);
               face_RunModel(false);
               int8_t *output_landmarks_buf = face_GetModelOutputPtr_PartitionedCall_2_70322(); // 136
               dequantize_int8(output_landmarks_buf, out_f1_landmarks, 136, 0.05879964306950569, -2);
               ULONG infer_end_time = tx_time_get();
               ULONG infer_time_ms = (infer_end_time - infer_start_time) * (1000 / TX_TIMER_TICKS_PER_SECOND);
               bool is_sleeping = check_drowsiness(&ear_tracker, out_f1_landmarks);
               if (is_sleeping)
               {
                   printf("WARNING: DROWSINESS DETECTED!\n");
               }
               for (int i = 0; i < 68; ++i)
               {
                   float norm_x = out_f1_landmarks[i * 2 + 0];
                   float norm_y = out_f1_landmarks[i * 2 + 1];
                   float kp_abs_x = norm_x * 160.0f;
                   float kp_abs_y = norm_y * 160.0f;

                   int cx = (int)((kp_abs_x - pad_left) / face_ratio) + x;
                   int cy = (int)((kp_abs_y - pad_top) / face_ratio) + y;

                   draw_points_rgb565(camera_capture_image_rgb565, 320, 240, cx, cy, 2);
               }
               APP_PRINT("\r\n[AI] NPU Inference Time: %lu ms, detect face: %d\r\n", infer_time_ms, out_n);
           }
           tx_semaphore_put(&g_ai_done_sem);
       }
   }
}
void draw_bbox_rgb565(uint8_t *img_buffer, int img_w, int img_h, int x, int y, int w, int h, uint16_t color,
                     int line_width)
{
   uint16_t *img = (uint16_t *)img_buffer;
   /* clip */
   if (x < 0)
   {
       w += x;
       x = 0;
   }
   if (y < 0)
   {
       h += y;
       y = 0;
   }
   if (x + w > img_w)
       w = img_w - x;
   if (y + h > img_h)
       h = img_h - y;
   if (w <= 0 || h <= 0)
       return;
   /* 画上下水平线 */
   for (int lw = 0; lw < line_width; lw++)
   {
       if (y + lw < img_h)
       {
           for (int i = x; i < x + w; i++)
               img[(y + lw) * img_w + i] = color;
       }
       if (y + h - 1 - lw >= 0)
       {
           for (int i = x; i < x + w; i++)
               img[(y + h - 1 - lw) * img_w + i] = color;
       }
   }
   /* 画左右垂直线 */
   for (int lw = 0; lw < line_width; lw++)
   {
       if (x + lw < img_w)
       {
           for (int j = y; j < y + h; j++)
               img[j * img_w + (x + lw)] = color;
       }
       if (x + w - 1 - lw >= 0)
       {
           for (int j = y; j < y + h; j++)
               img[j * img_w + (x + w - 1 - lw)] = color;
       }
   }
}
/***************************************************************************
* @details   在 RGB565 图像缓冲区上绘制一个实心圆点 (人脸关键点)
* @param     img_buffer: 图像缓冲区指针 (8位指针)
* @param     img_w:      图像宽度
* @param     img_h:      图像高度
* @param     x:          圆心 X 坐标 (预测出的人脸关键点 X)
* @param     y:          圆心 Y 坐标 (预测出的人脸关键点 Y)
* @param     radius:     圆点半径
******************************************************************************/
void draw_points_rgb565(uint8_t *img_buffer, int img_w, int img_h, int x, int y, int radius)
{
   uint16_t *pixels = (uint16_t *)img_buffer;
   // 2. 计算Bounding Box
   int x_min = x - radius;
   int x_max = x + radius;
   int y_min = y - radius;
   int y_max = y + radius;
   // 3. 边界检查:
   if (x_min < 0)
       x_min = 0;
   if (x_max >= img_w)
       x_max = img_w - 1;
   if (y_min < 0)
       y_min = 0;
   if (y_max >= img_h)
       y_max = img_h - 1;
   int r2 = radius * radius;
   // 4. 遍历包围盒,打点
   for (int py = y_min; py <= y_max; py++)
   {
       for (int px = x_min; px <= x_max; px++)
       {
           int dx = px - x;
           int dy = py - y;
           if ((dx * dx + dy * dy) <= r2)
           {
               pixels[py * img_w + px] = LANDMARK_COLOR;
           }
       }
   }
}
四、最终效果
[ram_thread] HyperRAM Initialized Successfully!
[net_thread] Waiting for PHY Auto-Negotiation (approx 2 seconds)...
Get flash id: 0x021a5befOSPI flash initialized successfully
[ram_thread] HyperFlash Initialized Successfully!
[ram_thread] HyperRAM Read/Write Test PASS! Data: 0xDEADBEEF
[net_thread] Checking Ethernet Link...
[Cam] MIPI Camera Init Success! Starting pipeline...
** [net_thread] Error: nx_ip_status_check failed! 0x43
[net thread] Ethernet link is up.
[net_thread] Waiting for Ethernet Link to be UP...
.....................
[net_thread] Ethernet Link is UP! IP Address Acquired.
[net_thread] Probing PC IP (ARP Resolve)...
[net_thread] Network Ready! Camera streaming allowed.
[AI] NPU Inference Time: 36 ms, detect face: 1
[AI] NPU Inference Time: 36 ms, detect face: 1
[AI] NPU Inference Time: 36 ms, detect face: 1
[AI] NPU Inference Time: 36 ms, detect face: 1
[AI] NPU Inference Time: 36 ms, detect face: 1
[AI] NPU Inference Time: 36 ms, detect face: 1
[AI] NPU Inference Time: 36 ms, detect face: 1
[AI] NPU Inference Time: 37 ms, detect face: 1
[AI] NPU Inference Time: 36 ms, detect face: 1
[AI] NPU Inference Time: 36 ms, detect face: 1
[AI] NPU Inference Time: 36 ms, detect face: 1
[AI] NPU Inference Time: 36 ms, detect face: 1
[AI] NPU Inference Time: 36 ms, detect face: 1
五、一些小问题
尽管推理时间仅需36ms,然而正如视频演示的,保持模型检测稳定需要一段时间,未来计划使用YOLO关键模型直接回归,实现检测框与关键点的直接获得,或许效果更优。最后受限于作者的开发水平,力有不逮之处,还请各位多多包涵,多多指教。
版块:
瑞萨电子
2026/03/18 11:11


全部评论